Cardboard Looms
(Courtesy of The Artful Parent)
Make a one-of-a-kind woven wall hanging at home with your children using a simple homemade loom! There’s no fancy & expensive craft materials required! You can also add more decoration by adding beads, pom poms or tassels to the hanging loop or to the bottom of the weaving.
You Need:
stiff cardboard (for the loom)
scissors
cotton twine
fabric remnants
ribbons
colored yarn
a stick or piece of dowel for hanging
Optional: Assorted pom poms, tassels or beads
To Make:
To make your weaving loom, start with a piece of rectangular cardboard. The size of your cardboard will determine the size of your weaving, but it’s best not to go too big. A 12×16 inch sized rectangle is perfect. Carefully cut evenly-spaced slits along the top and bottom of your loom that are about half an inch long and spaced half an inch apart as well.
Next you will add your warp (the vertical threads that hold the tension while you weave). Simply knot the end of a ball of cotton string or any old yarn onto the first tooth along the bottom or top. Then loop this over the tooth on the opposite side, then back around the 2nd tooth in the row you started on and continue until the entire loom is covered in vertical strings. Tie this off onto the last tooth.
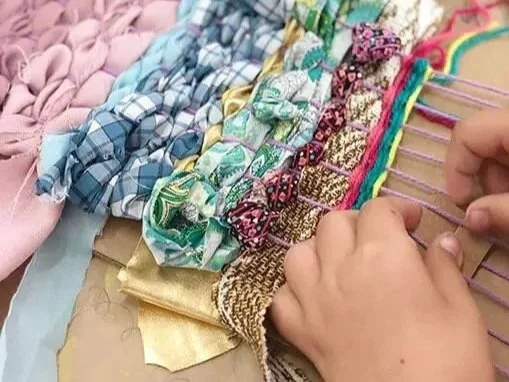
*** Double check children haven’t accidentally gone over to the back of the loom as this makes it difficult to remove the weaving when finished ***Prepare your fabric strips and yarn/string, you need to cut your fabric remnants into strips about 1–2 inches wide and as long as you wish. You can use colorful fabrics and interesting textures such as lace as well as yarn.
Create your first row of weaving for the kids to get started. To start weaving, simply add a fabric strip by first going over a warp thread and then under, then over and so on until you get to the end of the row.
Continue weaving in different colors, back in the opposite direction – if your last weave was under then start with over or vice versa. Then continue weaving until the entire strip has been added.
Remove the weaving off the loom by very carefully sliding the string loops off the teeth at the top of your loom one at a time directly onto a stick or dowel. Then remove the bottom loops, one at a time, cutting and knotting as you go. Add a string or ribbon loop to your branch or dowel for hanging.